
Once your business profile is set up in the Invoice Generator, creating a professional PDF invoice takes very little time. This guide walks through how the invoice builder works, how to use saved customers and items to speed things up, how GST is handled, and how to pick the right PDF template.
If you have not set up your profile yet, start with the setup guide first.
Three types of documents you can create
The tool supports three document types. You choose which one to create when you start a new document.

Tax Invoice is the standard document for billing a completed sale or service. If you are GST-registered, this is the document your client needs from you for their own GST input credit.
Proforma Invoice is used before a sale is completed. Common uses include requesting an advance payment, confirming a custom order before production starts, or sending a formal price commitment before delivery. It is not a tax document but is widely used in trade.
Estimate or Quotation is a non-binding document you send when a client wants to know the price before committing. It carries no legal obligation but sets the expectation of cost. Once the client approves, you can create the actual invoice.
Each type gets its own numbering sequence. The prefix and format are customisable in your business profile settings.
Building an invoice — line by line
Start a new invoice from the dashboard and fill in:
- Customer — type the customer name and select from your address book, or enter a new customer inline. Save new customers to the address book to reuse them on future invoices.
- Issue date — defaults to today, change as needed
- Due date — auto-filled based on the default payment due days in your profile
- PO number — if your client gave you a purchase order reference
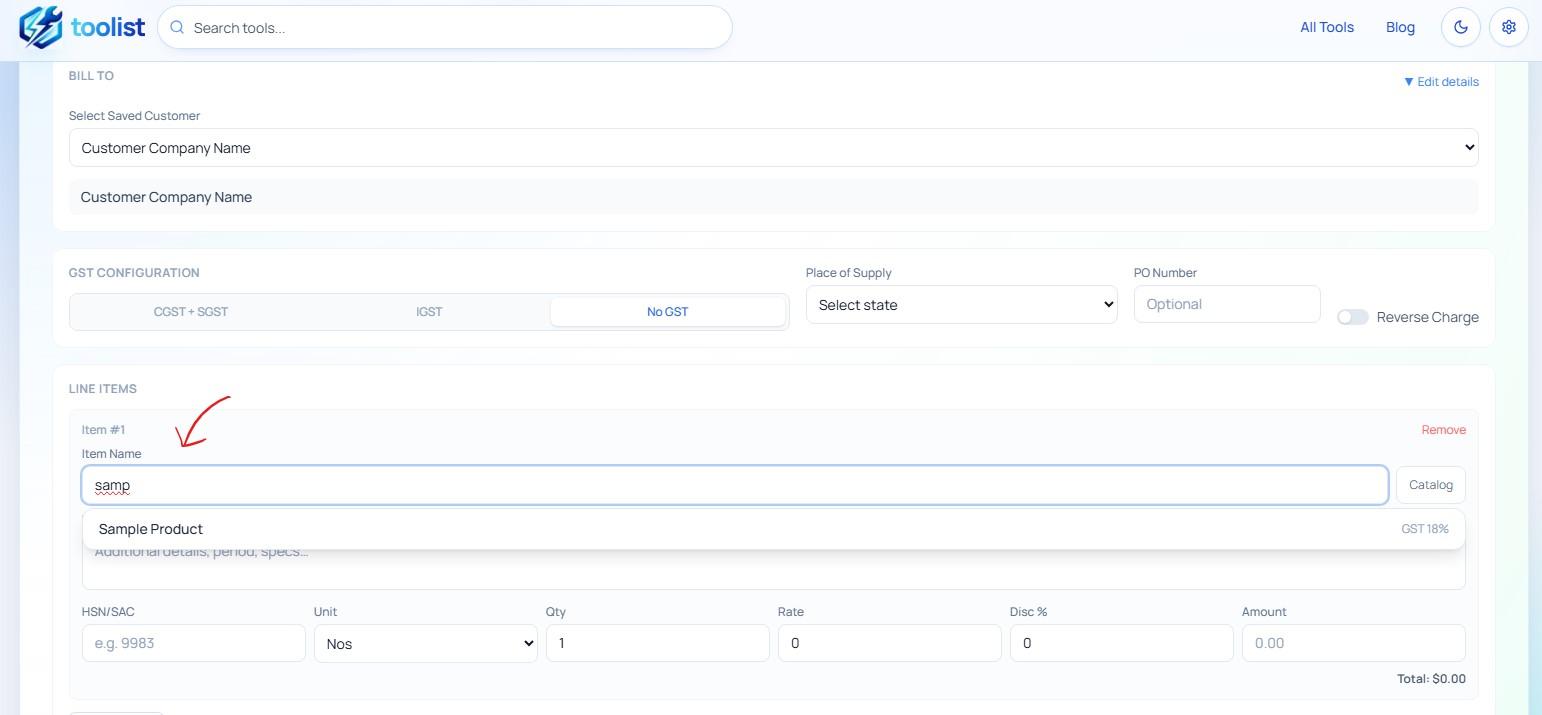
Adding line items
Each item on the invoice has:
- Item name — type to search your catalog or enter a new item
- Description — optional detail shown on the invoice below the name
- HSN or SAC code — for GST compliance (HSN for goods, SAC for services)
- Quantity and unit — supports 16 units including Nos, Kg, Litre, Hours, Days, Sq Ft, and more
- Rate — unit price
- Discount % — applied before GST is calculated
- GST % — per-item tax rate (0%, 3%, 5%, 12%, 18%, or 28%)
The tool calculates the taxable amount, tax components, and line total automatically as you type.
Using the item catalog
If you save items to your catalog, you can add them to an invoice in seconds. Start typing the item name in the item field and your saved items appear as suggestions. Selecting one auto-fills the rate, unit, HSN/SAC code, and GST percentage — no re-entry needed.
This is especially useful if you sell the same set of products or services repeatedly. Set up the catalog once, and invoicing becomes much faster.
How GST is handled
CGST + SGST versus IGST
For Indian businesses, the correct GST type depends on where the supply is made:
- Same state as your business → CGST + SGST applies (split equally)
- Different state from your business → IGST applies (full GST as a single line)
When you select your customer, the tool checks whether the customer's state matches your registered business state and automatically sets the GST type. You can also override it manually using the place of supply field.
Mixed GST rates on the same invoice
Each line item has its own GST rate. A single invoice can have some items at 5%, others at 18%, and others at 0%. The totals section at the bottom correctly groups and sums the tax by rate.
Inclusive GST entry
If you already know the total amount including GST but need to back-calculate the base rate, the tool has a convenience field for that. Enter the GST-inclusive amount, select the GST rate, and the tool calculates the correct base rate for you.
GSTR-1 and HSN summary
For GST filing, the tool's GST Summary section shows a month-wise breakdown of taxable turnover, CGST, SGST, and IGST totals, along with an HSN/SAC-wise breakdown that maps to what is needed for GSTR-1 filing.
Choosing a PDF template
Before downloading, switch to the preview tab to see how the invoice will look as a PDF and to choose a template.
Three templates are available:
Modern — A coloured header (using your brand colour from the business profile) with the invoice amount and number prominently displayed. Clean, professional, works well for most businesses.
Classic — A bordered corporate layout with your business name on the left and invoice details on the right. Suited for more formal or corporate invoicing.
Minimal — A monospace, low-decoration design. Practical and clean for technical services, software, or anyone who prefers a stripped-down look.
You can switch between templates in the preview and the change applies instantly. Set a default in settings so all new invoices use your preferred template automatically.
Downloading the PDF
Once you are happy with the preview, click Download PDF. The file is saved to your device with a clean filename in the format INV-2026-001 - Customer Name.pdf.
The PDF includes:
- Your business header with logo and contact details
- Customer billing details
- Complete line items table with HSN codes, quantities, rates, discount, and GST breakdown
- Totals section with subtotal, tax, and grand total
- Amount in words (Indian numbering — Crore, Lakh, Thousand)
- Bank details and payment modes
- Terms and conditions and notes
- Any other sections you have enabled (status badge, QR code, authorized signatory)
Tracking invoice status
After creating an invoice, you can track its status from the dashboard. The four states are:
- Draft — still being worked on, not sent
- Sent — shared with the client, waiting for payment
- Paid — payment received
- Cancelled — revoked
Click the status badge on any invoice to move it to the next state. When you record a payment, the status updates automatically.
The dashboard shows summary totals at the top — total invoiced, total paid, and total pending — so you always know where things stand at a glance.
Recording a payment
When a client pays, open the invoice row on the dashboard and use the Mark Paid option or expand the payment form. You can record:
- Date of payment
- Amount received (supports partial payments)
- Payment mode — Cash, UPI, Bank Transfer, Cheque, Card, or Other
- Transaction reference or UTR number
- Any notes
Each invoice keeps a full payment history, so partial payments are tracked correctly.
What to read next
The pro tips post covers advanced settings like logo customisation, payment QR codes, the authorized signatory section, default terms, and invoice number formats.